TL;DR:
LinkedIn Post Inspector is a free debugging tool that helps you preview and fix link previews before posting.
Simply enter your URL at linkedin.com/post-inspector to check images, titles, and metadata, then update your Open Graph tags and refresh LinkedIn's cache for perfect link previews.
This is for you if…
Your link previews on LinkedIn never look right.
OR
You are sharing a URL on LinkedIn but cannot display URL previews.
Something like this…

Don't worry; you're not doing anything wrong.
It's just the tiny bits you're missing out on that I'll explain in this blog but before that, I have a quick question for you:
Did you know LinkedIn has a debugging tool called LinkedIn Post Inspector?
No? I also found out about the tool when I couldn't preview links I shared on LinkedIn. Those random previews made my posts look bad!
LinkedIn launched LinkedIn Post Inspector in 2018 to make marketers' work easier.
How?
Well, that's precisely what we will explore in detail as we learn about-
◾What is the LinkedIn Debugging Tool, aka, LinkedIn Post Inspector?
◾How to use it correctly to debug potential issues?
◾And 3 easy steps to fix the errors it identifies.
But first, you need to know why testing is so important. So order your favorite pizza, and let's begin!
.gif)
Why Do You Need To Test Before Publishing?
I post regularly on LinkedIn, and I always check my previews before hitting that "publish" button.
Wanna know why? Here's the main reason-
Link Previews

Link previews are like a book cover for your post or like a YouTube Banner for your post They're the first thing people see, and it is what makes people decide whether to click on your post or not.
So, testing these previews becomes the most crucial step before you hit the 'Post' button.
It lets you take a sneak peek of how the post will appear to your audience and you can make adjustments based on the preview.
This way, you can make sure they catch people's attention and work the way you want when your post goes live.
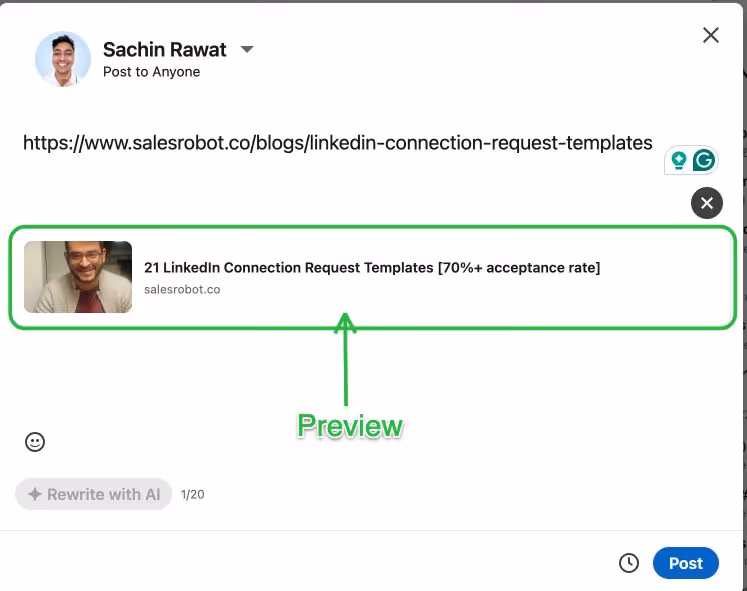
Let's have a look at this link preview for example:
.avif)
Can you guess what is wrong with this post?
Yes, you're absolutely right! There's no image in the link preview.
This looks so unprofessional that no one will read that post.
And I'll admit testing takes a bit of extra time, but the payoff is worth it!
I know what your next question "?"
Well, I do it with LinkedIn post inspector.
What Is LinkedIn Post Inspector?
Heard the name but don't know what it is? No worries – I'm here to give you the lowdown. But first, let me explain how link previews work on LinkedIn.
When you share a link on a post, this is what the preview looks like.
We've all seen a preview like this at some point, right?
Now, if you look closely, LinkedIn showed me the author images as the preview image (which was my blog banner).
Doesn't really leave a good impression, right?
So, why did this happen?
Well, it comes to LinkedIn and its rules. LinkedIn has some strict guidelines regarding link previews, like:
◾The image should be cropped in a 1.91:1 ratio (1200*627 pixels) and must be no more than 200 pixels wide.
◾The title of the post can be up to 150 characters.
You can quickly check if your posts fulfill the requirements with the help of Post Inspector.
It's a free tool on LinkedIn that can take your posts to the next level.
How?
It allows you to preview how a shared URL will appear on the LinkedIn platform before you actually post it, helping you identify and fix any display issues with the link's thumbnail image, title, and description.
The tool validates link previews, images, and metadata to ensure your content displays as intended by providing previews which include:
◾ The cover image for your link.
◾ Your post title.
◾ The metadata.
And the best part? Perfecting these previews before your posts go live can easily help you gain more engagement.
It's a win-win situation!
.gif)
In simpler terms, LinkedIn post inspector can help you:
◾ Identify the missing data on your page.
◾ Refresh LinkedIn's data about your page.
◾ Extract your content's metadata and show you what's right and what's not.
Can't wait to see how this works?
Just scroll to the next section.
How To Use The Post Inspector As A LinkedIn Debugger?
To access LinkedIn post inspector follow these 4 steps:
- Go to the LinkedIn Post Inspector and enter the URL you want to inspect.
.avif)
- Click 'Inspect' and you'll be able to see the exact preview of your post.
- Here's what mine looks like:
.avif)
The image as you can see is cropped just the same way as above.
4. Some additional metadata the tool shares are:
- Title
- Type of Content
- Meta description
- Author
- Publish Date
.avif)
All of this data is gathered by the post inspector using OG tags or the Open Graph Meta tags.
But wait…
I know what you're thinking. Are blog links the only ones we can inspect using the LinkedIn debugger?
The answer is NO.
Does LinkedIn Post Inspector Accept Any Links?
Yes, the LinkedIn debugger tool accepts all types of links.
Let's inspect this video for instance.
Here's how the link preview looks like:
.avif)
And here's all the metadata it gathered:
.avif)
See how easy that was?
It does not take more than 3 seconds!! You can inspect blogs/ videos/websites with the LinkedIn debugger tool (if you wish to share those on LinkedIn).
Okay, now that you know about Post Inspector, let's check out how we can use it to spot and fix different issues.
Use It As A LinkedIn Cache Debugger
So you recently updated your blog content, but LinkedIn's link preview still displays an old version of it?
This happens because LinkedIn caches and stores link preview content typically for 7 days.
If you changed your content in those seven days you might want to refresh it manually for an immediate update.
But how will you know when did LinkedIn update its cache on your URL?
It's super easy, here's how:
When you inspect a URL, under the 'URL information' section, the tool displays when it last scraped your data from that link.
.avif)
In this case, it says 'in a few seconds.'
If it says more than 3-4 days old, you need to request a re-scrape from LinkedIn to update your data.
Why Is LinkedIn Post Inspector Not Working?
Most of the time it's a broken link, bad OG tags, or LinkedIn cache lagging behind.
Always double-check the URL, refresh cache, and you're sorted.
Use It As A LinkedIn Link Debugger
When you inspect any link with the debugging tool, it displays a preview of how it would look when you share that link on LinkedIn, right?
Now let's understand it better with an example:

Here, my main title was 'LinkedIn Follow vs. Connect: Which One Is Right For You? [+7 Actionable Steps]', which you can see on the left side of the image above.
But on the right-hand side, there are some alternate values it considered, which might have been displayed instead.
There is also a 150-character limit, so it won't be displayed fully if your title is too long and you must shorten it.
This is the same with all the values it displays. If you see something unusual, it's important that you update it and refresh your data asap!
Use It As A LinkedIn Open Graph Debugger
By now, you must have figured out LinkedIn Post Inspector uses something called open graph meta tags to gather and display data related to the link you shared.
Hence, it is also known as the LinkedIn Open Graph Debugger.
Everything from the preview image to the author and publishing date depends on how accurately you set values for these 'og' tags on your website.
Here are the og tags LinkedIn scrapes:
- Title (og:title)
- Type (og:type)
- Main Image (og:image)
- Meta Description (og:description)
- Author (og:author)
- Publish Date (og:publish_date)
.avif)
So you know what to fix if your link previews don't work quite as intended.
Now that we've found all the problems with our link previews, let's chat about how we can fix them.
How To Fix The Link Preview Image Shown In LinkedIn Post Inspector?
Suppose you paste a link and the preview image is incorrect or not displaying properly (probably cropped).
What could be the possible reasons behind this?
Well, here are 3 things that could have happened:
- You didn't assign any value to the 'og:image' tag.
In this case, the tool will display the first image from your blog post.
For us it was the banner/cover image.
- You updated the cover image of your content but didn't update your og tags.
Because you did not update your open graph tags, you will still see your old image in the preview.
- Your preview image size is too large, so it is getting cropped to fit in.
For the first two issues, you must follow the steps to fix your open graph meta tags. If you are facing the third problem, you need to crop your image in the correct ratio.
How To Fix The Link Preview Title Shown In LinkedIn Post Inspector?
There are only a few things that might be causing the issue. It could be either because:
- Your title is too long so it's getting cropped.
- You updated the title in your content but didn't update the og tags, so you're seeing an outdated title.
So what can be done?
- You need to rewrite your title within 150 characters so it can be displayed completely (or just let it get cropped.)
- You need to update your og tags and refresh LinkedIn cache to fix the title preview.
For the last 3 mins, I've pointed all the problems related to OG tags that you could come across. Now, let's see how you fix them…
How To Fix The Open Graph Meta Tags?
You can fix open graph meta tags using HTML or your website builder's content management system (CMS).
Fix OG Meta Tags using a CMS
You must first update the webpage you wish to share on your LinkedIn post.
Your CMS may or may not provide default OG meta tags.
For example, Wordpress does not.
In that case, you must get a plugin like YoastSEO or All in one SEO pack that will populate these tags for you. If your CMS already provides them, you can skip directly to the steps.
Once you have access and have activated your plugin, follow the below steps:
- Head over to the SEO/ social section in your CMS or plugin and confirm that the open graph tags are enabled.
- Locate the open graph meta tags and fill them with the values you just updated your webpage with.
Here's an example from Webflow:
.avif)
- Fill in the "Open Graph Title", you can also use your blog title here.
- Next, fill in the "Open Graph Description." You can also reuse your blog's meta description here.
- Finally, add an "Open Graph Image." I suggest using a cropped version of your blog's banner/top image here.
Of course, you can add custom open graph titles/images if you want.
- Verify and save all the details, and you're good to go!
Fix OG meta tags using an HTML
If your website works with simple HTML pages and you've access to the code. Here's what you need to do…
Open your HTML editor and follow 3 simple steps to add/ update your og tags via HTML:
- Locate the <head> section.
- Add or update the OG meta tags inside the <head> section (Between the <head> and </head> tags). Here's how it looks like:
<head>
<!-- Other meta tags -->
<meta property="og:title" content="Your Page Title">
<meta property="og:description" content="Your Page Description">
<meta property="og:image" content="URL to Your Image">
<!-- Other meta tags -->
<head>
.avif)
- Save and upload the new version to your server.
Make sure to have a look at the updated previews on the LinkedIn Post Inspector.
Let's say you've updated the tags, but how do you make sure LinkedIn picks up the latest version of your page?
You'll be surprised at how easy this one is!
How To Refresh Linkedin Cache With Linkedin Post Inspector?
I know you were waiting for this one.
.gif)
If you are seeing an old preview of your content after updating it, refreshing cache will update LinkedIn's database and display its updated version.
What do you need to do?
You can use the Post Inspector as a tool to refresh the URL by following these steps:
- Open LinkedIn Post Inspector.
- Enter your URL and click 'Inspect.'
- That's it, LinkedIn cache has been refreshed now.
You can now go ahead and share your link on LinkedIn.
Wait…what? This didn't work?
.gif)
It's unlikely, but not impossible.
If you ever come across such a problem, all you have to do is add a new query string at the end of your URL starting with '?' followed by any word or letter.
It could be anything and would look something like this: '?latest,' '?new,' '?updated.'
.avif)
This nudges LinkedIn to consider it as a new request and generate the latest preview of the URL.
Another little query…
Can LinkedIn Say 'Cannot Display Preview' For No Reason?"
Yep. Happens.
Sometimes LinkedIn's servers hiccup. If your URL is fine, just retry after a few minutes or tweak it with a query string like "?latest"
What To Do If Linkedin Post Inspector Stops Working?
Did you also see an error message like this one?
"We cannot display a preview for this URL."
"Cannot display preview" etc.
.avif)
No need to hit the panic button.
This mostly happens when you share a broken or incorrect link with the LinkedIn debugging tool.
To resolve this, here's what you can do:
◾Recheck the URL you entered and try again.
◾Test your internet connection.
◾Try again after sometime.
If you're dealing with LinkedIn link preview not working issues, these troubleshooting steps usually solve the problem.
But Wait, Is It Even Available On Mobile?
Yes, LinkedIn Post Inspector can be accessed via mobile too.
However, we suggest you use a desktop to fix the issues it helps you find.
All you need to do to use the tool on mobile is to click here and test your links, as usual, to identify and fix any issues before they go live on LinkedIn.
Should You Take Linkedin Post Inspector Seriously?
Yes, you should because
◾ It's free
◾ Quick
◾ Makes your posts look professional and
◾ Protects you from goof-ups on link previews
So, there you go! Now you know how to
- Fix your LinkedIn previews for better engagement
- Post perfect-looking links on LinkedIn.
But wait a second, is posting with perfect links enough to get you more leads for your business?
You need to connect, interact, and reach out to people engaging with your posts.
And the most important part…
You should also be reaching out to potential prospects on Linkedin daily.
But manually prospecting and doing outreach all by yourself is not sustainable. You'll create a black hole that consumes your time and sleep.
This is where SalesRobot comes in. It's your golden ticket to generate warm leads via cold outreach. You can build meaningful relationships with potential clients using
- Hyper-personalized message options with GIFs and images
- Smart reply detection
- AI Variables lets you personalize a message with more than just {{firstName}} or {{companyName}}
Moreover, if things get too busy for you, SalesRobot's AI Inbox Manager can step in.

It can draft replies in the way you would using our CoPilot mode.
It can also handle chats automatically using the Autopilot mode until Prospects do reply.
And if you want to stand out, drop a quick voice or video note inside your outreach.
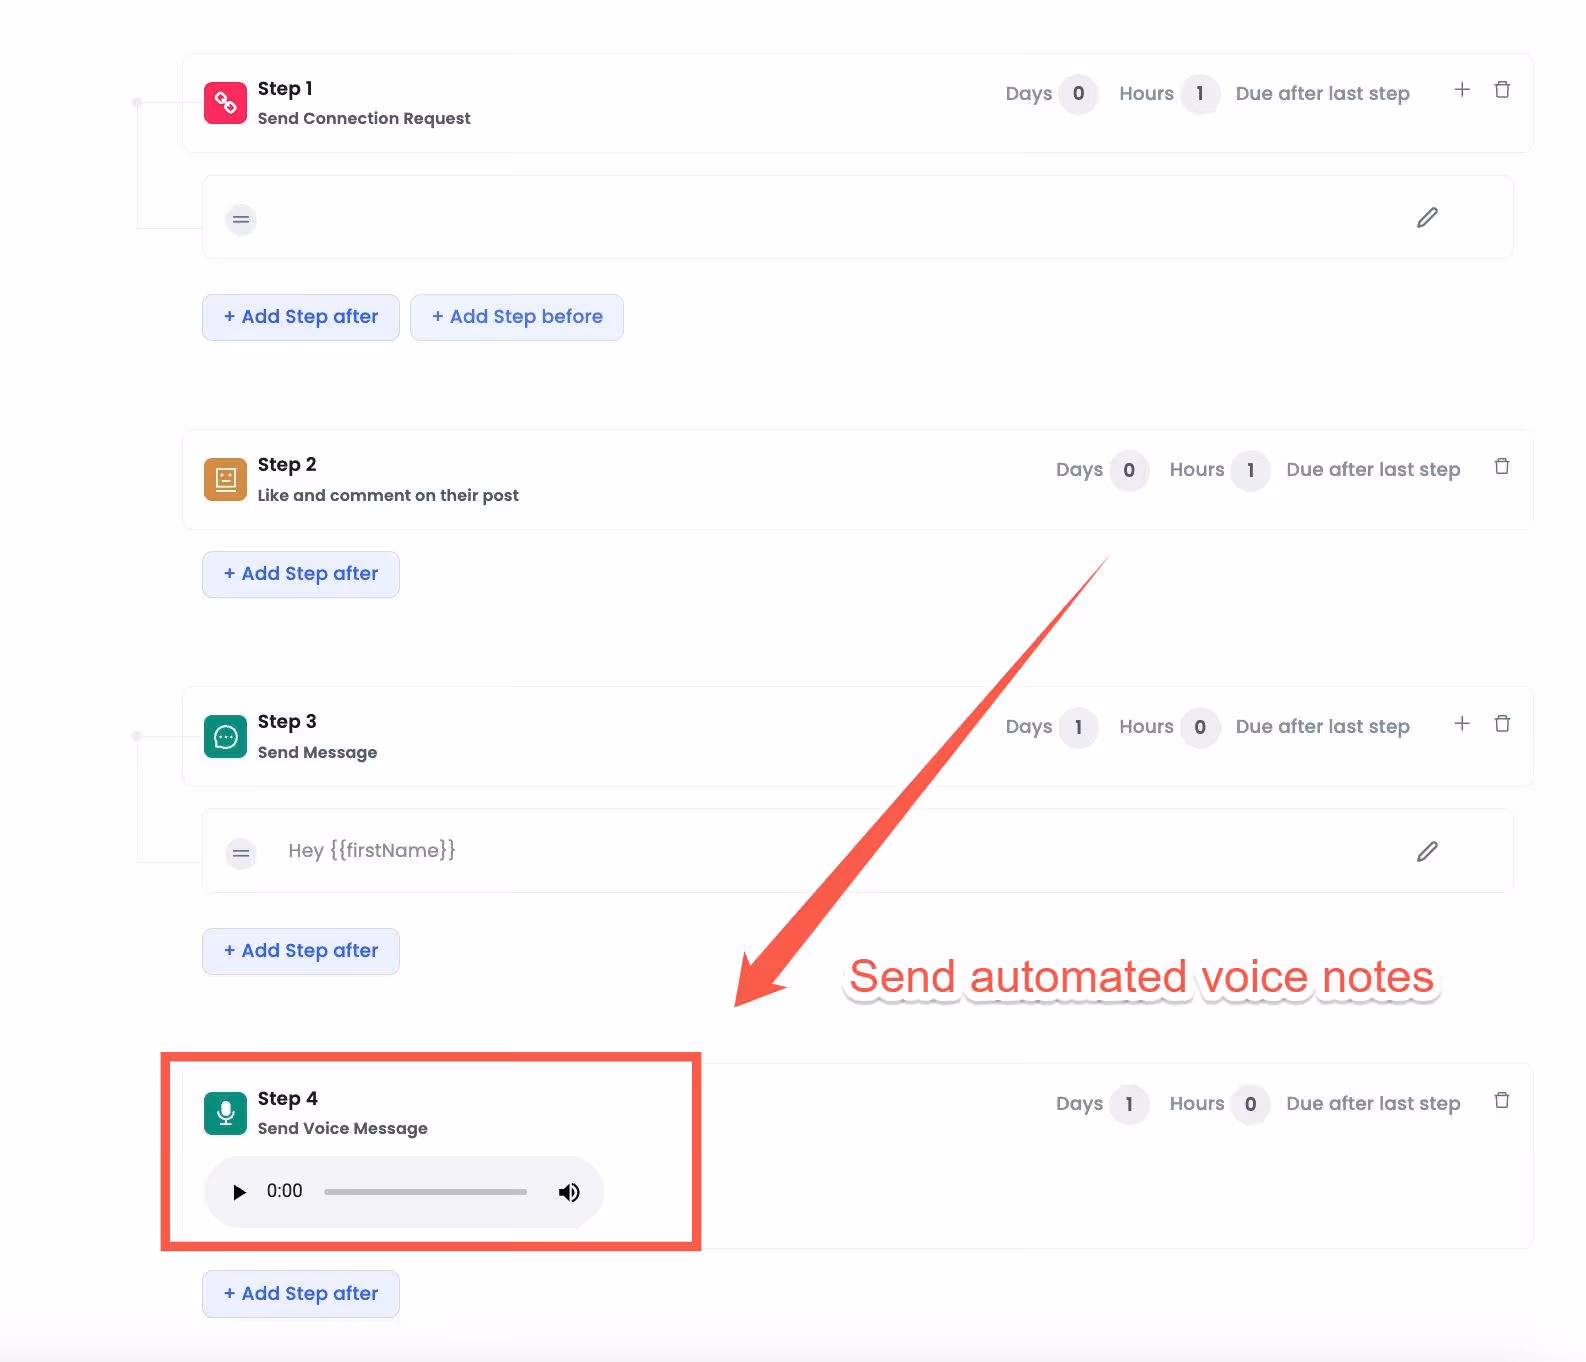
It feels real, builds instant trust, and usually gets way more replies than plain text.
But there's more…
SalesRobot keeps sending messages, liking, commenting on posts, and following up on your behalf and creates a bond with potential clients before getting down to business.
But my advice is not to rely too much on LinkedIn for leads. You should also do cold emails.
Speaking of which, this little robot now lets you buy multiple email inboxes with one click. In just a few weeks, you'll have a solid cold email infrastructure ready to fly and land all your emails in your prospect's primary folder.
You also don't need to switch between tools to find data; SalesRobot now allows you to find verified email addresses on the go.
To summarize SalesRobot now does:
◾ LinkedIn automation
◾ Cold email automation
◾ Contact data enrichment
◾ Cold outreach AI assistant that can book meetings

Wake me up when some other tool starts doing all of that! 😴
It's your little robot buddy that works round the clock so that you can have more free time to spend with friends and family. 🙌
SalesRobot does come with a price tag of $59 per month but I believe you should try it out for free before taking the plunge.
And,that's why we have a FREE 14-day trial where we don't ask for your credit card details or your phone number.
Just take it for a spin and see how you like it.
Cool?
See ya later!
Frequently Asked Questions
How to tag someone in a LinkedIn post?
To tag someone in a LinkedIn post, simply type @ followed by the person's name while composing your post. LinkedIn will show you matching connections and contacts, and you can select the person you want to tag. They'll get notified and their name will appear as a clickable link in your post.
Can LinkedIn Post Inspector fix all link preview issues?
LinkedIn Post Inspector can identify most common issues like missing images, incorrect titles, or outdated metadata. However, it cannot fix server-side issues or problems with your website's Open Graph configuration - those need to be resolved on your end.
Does LinkedIn link preview work for all types of URLs?
LinkedIn link previews work for most public URLs including blog posts, articles, videos, and websites. However, some URLs behind login walls, private content, or certain file types may not generate previews properly.

Wow your leads by cloning yourself and sending personalized videos and voice notes to each lead on LinkedIn.
If you don't reply to leads within 5 mins, your chances of converting them fall by 50%. Our AI replies on your behalf instantly! (and yes, you can train it)

Don't shoot in the dark. Get detailed analytics on what's working
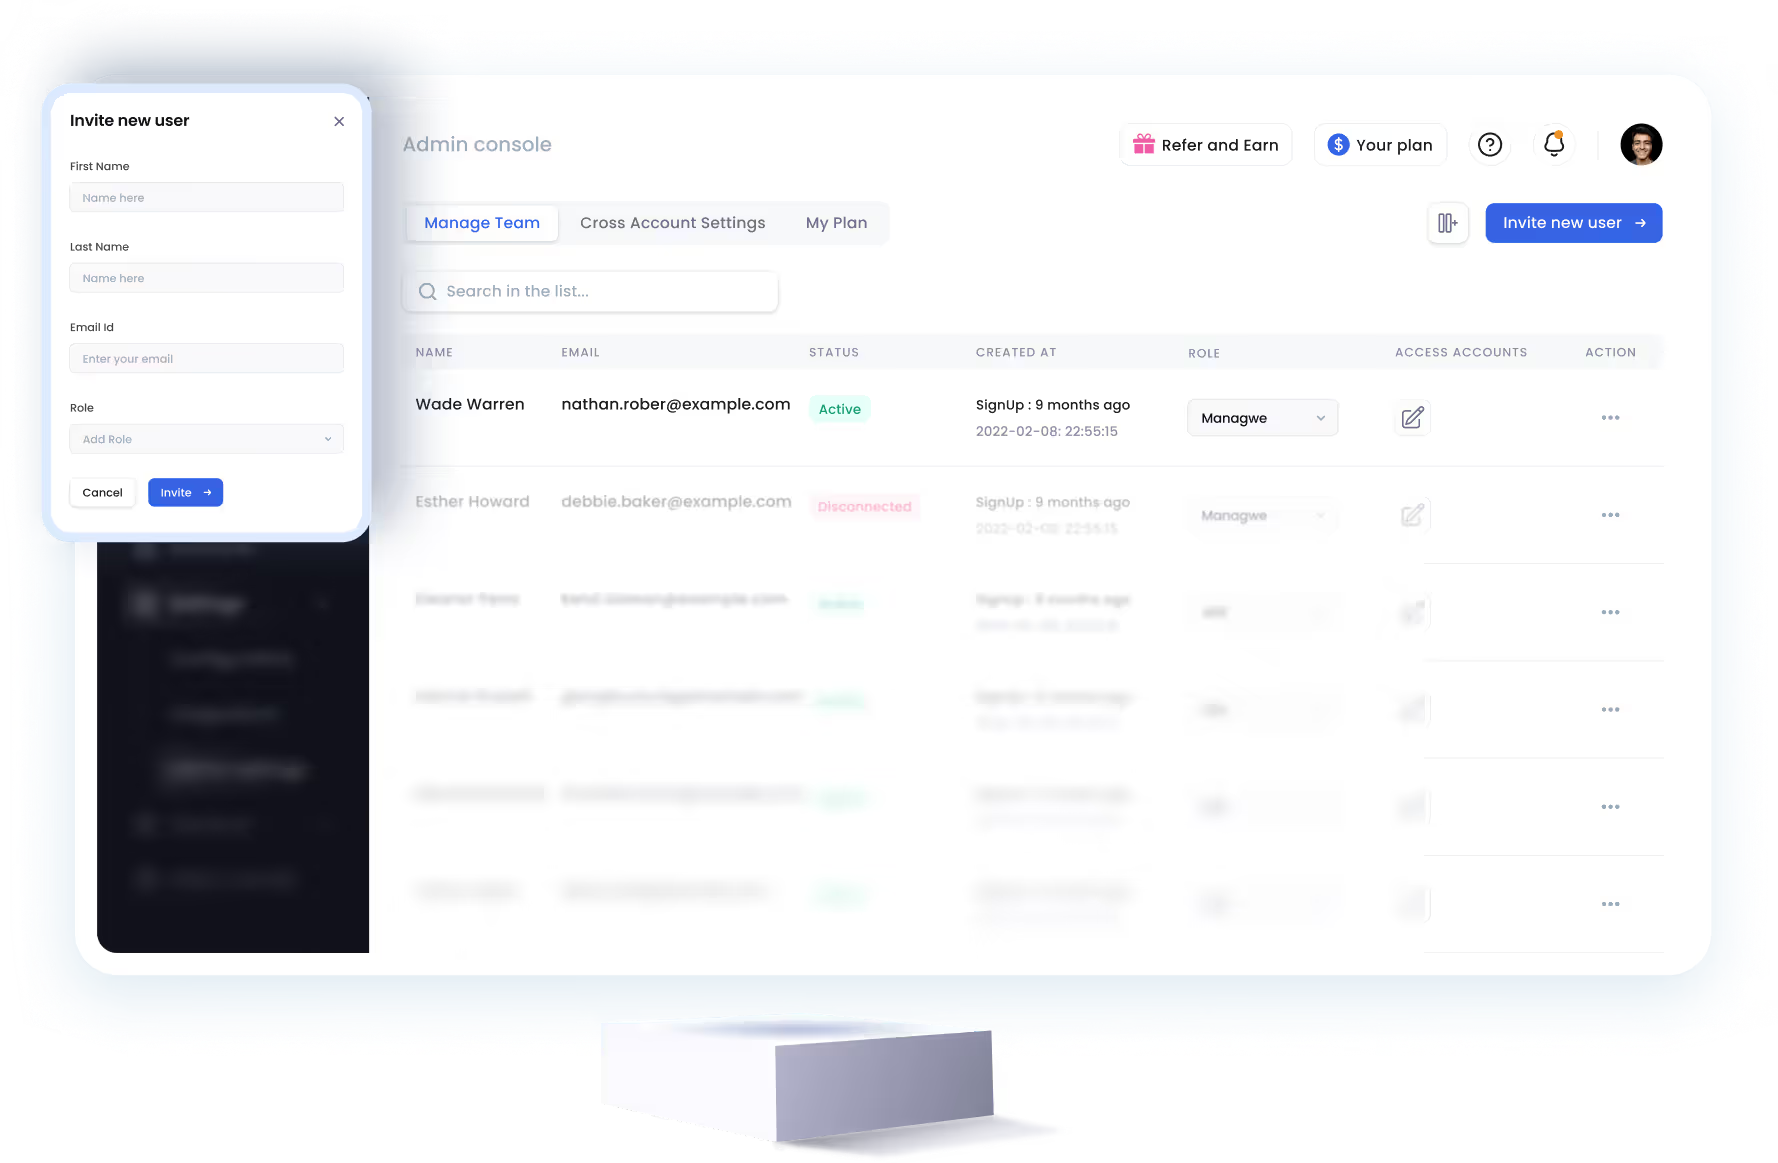
SalesRobot allows you to invite other team members, so that they can add their LinkedIn Account, run outreach campaigns and get amazing results just like you.
Trusted by 4100+ innovative B2B sales teams and lead gen agencies

.avif)

.avif)


.avif)


.avif)